Tuesday, June 30, 2015

Eggs with Peppers & Goat Cheese


Breakfast is the most important meal of the day yet we often take it for granted. These eggs with peppers and goat cheese are incredibly delicious and at the same time super nutritious and easy to make. The peppers provide Vitamin C, the eggs provide protein and the goat cheese provides calcium. Serve with toast and a serving of fruit and you are ready to start your day just right. My friend and I have this sometimes even for lunch because it is that good. If you don't like goat cheese, try this recipe with good qality feta. Enjoy! 

Makes 2 servings 

Ingredients: 

5 - eggs (you may do just 5 egg whites as well)

5 - mini sweet peppers,chopped or sliced  

3oz - goat cheese, crumbled 

1 teaspoon + 1 tablespoon - olive oil 

salt and pepper to taste 

Directions: 

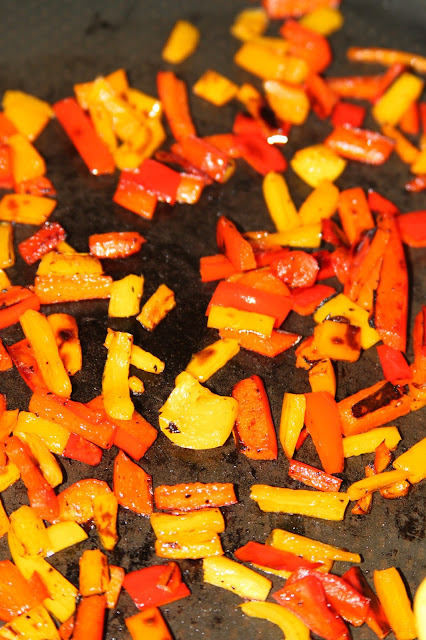
Fry the peppers on medium heat with 1 teaspoon olive oil, cover for best results. Peppers are done when they are tender and you notice the skin of the pepper is starting to brown. 


Take pan off heat and turn heat to low. Allow a minute or two to cool off. Scramble the eggs in a bowl. Do not over scramble.

 Add 1 tablespoon of olive oil, salt and pepper to the peppers and mix. Return to heat and add the eggs. Fry eggs and peppers until eggs are almost done. Add the goat cheese and mix while scraping the bottom of the pan. Eggs are ready when cheese is mixed well. You may add more salt or pepper if needed. Garnish with a little more goat cheese if desired. Enjoy this healthy breakfast! 


Sunday, June 28, 2015

Cherry Almond Bars


I LOVE the combination of cherries and almonds. These contemporary bars can not taste any more perfect. They state summer, they state American and you will not be able to be satisfied with only one piece. This desert is perfect for 4th of July celebrations or in my case any day of the year. It is made with canned cherries vs cherry pie filling and that makes all the difference in the world. But I should stop bragging about it. This desert will speak for itself. Enjoy! 

Ingredients:

2 blocks - unsalted butter

2 cups - vanilla milk (or white) chocolate chips

4 eggs

1 cup - sugar

2 cups - flour

1/2 teaspoon - salt

2 teaspoons -  amaretto or almond extract

2 cans - canned cherries (Oregon brand preferably), well drained

1/4 of a cup - sliced almonds + more for garnish

sweet raw cherries for garnish

blueberries for garnish (optional if you desire to decorate the bars as the American flag)

Directions:

Heat oven to 325 degrees F. Grease 9" by 13" baking dish. Melt butter in a small sauce pan over low heat. Remove from heat. Add ONLY 1 cup of the vanilla chips. LET STAND; DO NOT STIR.

In a large bowl, beat eggs until foamy. Gradually add sugar, beating at high speed until lemon-colored. Stir in vanilla milk chip mixture. Add flour, salt and amaretto; mix at low speed until just combined.

Spread half of batter (about 2 cups) in greased and floured pan. Bake at 325 F for 15 - 20 min or until light golden brown.

Stir remaining 1 cup vanilla milk chips into remaining half of batter; set aside.

Warm up the canned cherries in a small sauce pan over medium heat. Stir and mash the cherries until they look like they are easily spreadable. If too much juice, drain. Spread evenly over warm, partially baked crust. Sprinkle with 1/4 cup of almonds.

Gently spoon teaspoonfuls of remaining batter over fruit and almond spread hiding the fruit. If fruit still shows sprinkle more almonds.

Return to oven; bake an additional 25 to 35 minutes or until toothpick inserted in the center comes out clean. Cool completely. Decorate with fresh cherry halves and almonds. Blueberries as well if desired to decorate bars as the American flag. Cut into bars and enjoy!


Saturday, June 27, 2015

4th of July Table Setting


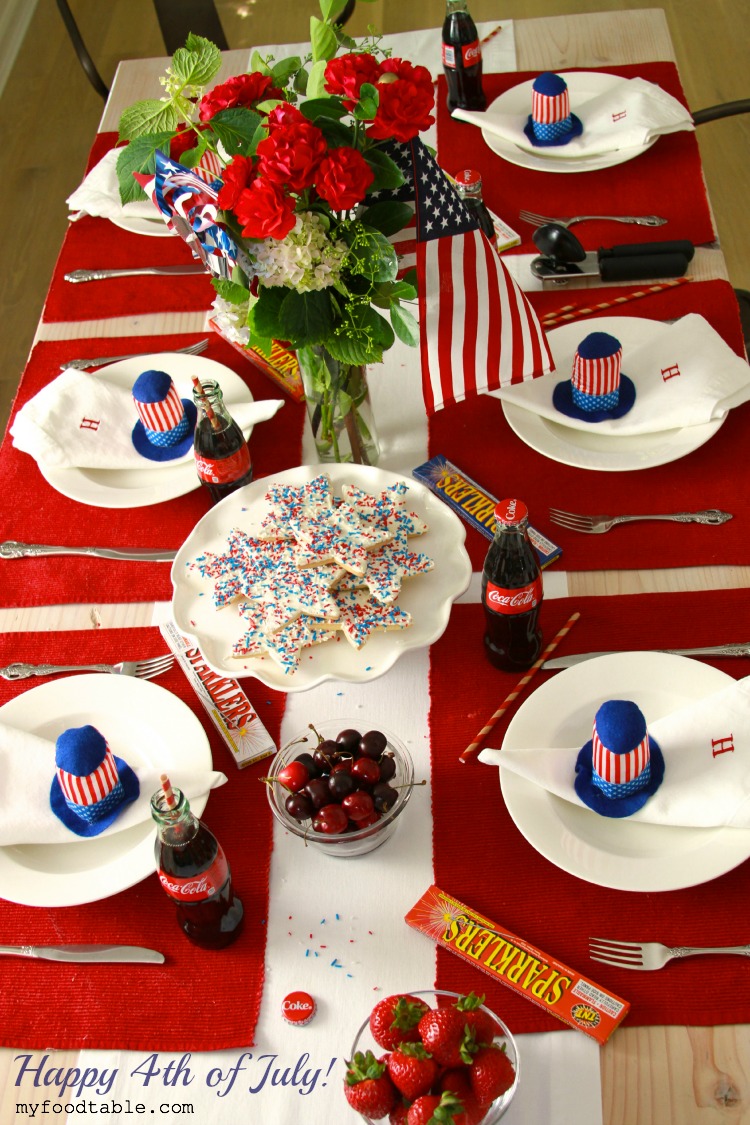
If you are hosting a 4th of July lunch or dinner, this table setting is very easy and inexpensive to do. Here is how: 

1. My guess is you already have a plain white table cloth or a table runner. It is a standard for every home. You also probably have plain white napkins. That's great because you will need them too. Red or blue ones would work too.

2. Red or blue placemats. I used the ones I had from Christmas. If you don't have any they can be found at Walmart for very cheap.

3. Plain white plates. They are standard so you should have some at your home. If you don't have any they are super easy to find. Even at the dollar store.

4. Sparklers are very inexpensive and a great addition to your 4th of July table and you get to use them after dark. You can even tie a ribbon around them if you would like.

5. USA little hats for decoration over the plates. I found those at Walmart. You can really use anything as long as it is red, or blue. White might work too.

6. Centerpiece. In my case I used red and white flowers. You can use one or the other. I would try to stick with the same colors that are on your table. Any other colors may deviate from the theme.

7. Flag and Toy Windmill.  I put a flag and a toy windmill in the vase with the flowers to make it a little more patriotic and to connect the centerpiece with the rest of the items on the table.

8. Decorate with food. Food is so great to decorate with since you will end up eating it anyway. I love the COKE idea since Coke is a great symbol of America. Also any food that is July appropriate or American especially if it is of the same color theme such as Cherries, Cookies, Berries, Pies, etc.


Easy Spring Table Setting

 I love springtime! The beautiful blossoms on the trees, the flowers adding color to the scenery, the flower fragrance I can smell in the air, and watching people walking all around enjoying sun's warm rays. I particularly love purple flowers, and so I thought it would be appropriate to incorporate purple for my spring table setting. This table setting is very inexpensive, and so easy. 

           
     Start with picking three colors that you like. Perhaps use colors that you already have in your kitchen, table napkins that you already own that are spring colors or perhaps flowers that are already growing in your backyard or your favorite flowers that you are planning on using as a center piece. In my case I went with purple, yellow and green. As you can see on the picture below I also have light and dark purples, dark and lime greens and the yellow is definitely the accent. 


For the center pieces you will need short vases or anything that is short with clear glass. They don't have to match as long as they are clear and about the same hight. I used a clear vase, a clear bottle, two wine glasses and a glass jar from a candle. I used six of them but you may use as many as you wish. Cut the flowers to fit the vases and arrange. There you go, you have simple center pieces. I had these vases for a week after the dinner and they made my kitchen smell divine. If you have a round or square table I would suggest that you use one center piece that is fuller with flowers.

You will need basic white plates and color napkins that match the centerpieces or color plates that match the centerpieces and basic white napkins. I used a plain white table runner as it made the colors of the flowers pop but you may use a different color. For example this setting I could have used a yellow or lavendar color table cloth. I picked white because you can never go wrong with white. White also gives this setting ellegance and simplicity. 


If you know me you will find that I have an eye for detail. I like cemetric things. Try to aline the plates the same distance from the edge of the table. Match the same position of the plates across the other side of the table. Repeat with the glasses, silverware and napkins. 


If you want to make it a little fancy and more personal, add name tags. These are the easiest name tags I have ever made. I used an ink stamp and then manually wrote the name of the person on the name card. You may also write something like "Happy Spring", or whatever the ocassion is. Just remember use your creativity and have fun!  

Thursday, June 25, 2015

Filo Dough Pastry Cups


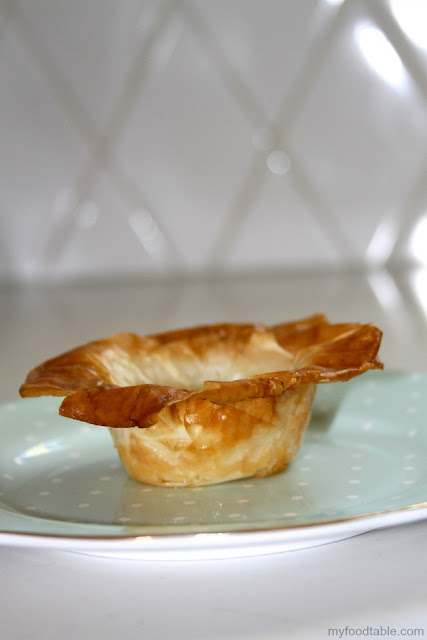
Summer can be overwhelming with all the planned activities. If you are planning a summer party of any kind, do yourself a favor and don't make your life more complicated than it already is. Simply invite people over to have some ice-cream. Some might think this would be boring, but look at these filo dough pastry cups you can make, with which you can do so much. They are buttery and crunchy and delicious.  Add ice-cream,  frozen yogurt or gelato, and decorate the pastry cup with chocolate, nuts, honey, mint, peanut butter,  jam, wafer sticks,  fruit, sprinkle with coco powder or anything you can think of. There are so many options! All of a sudden your ice-cream party will be the hit of the day! 

Ingredients: 

8 oz - fillo dough (9"by 14"sheets) - thawed 

1 stick - butter, melted 

granulated sugar 

oil spray 

Directions:

Preheat oven to 400 F. On a clean surface place a sheet of filo dough (make sure you keep the rest of the sheets wrapped in the plastic while you work with one sheet. They will dry fast otherwise.)With a rubber brush, butter slightly the filo sheet. With a spoon drizzle lightly the sheet. Cut the sheet in ribbon like sheets and fold into a muffin pan to form the muffin cup, pressing the sides and the bottom. Trust me this would not look pretty but they will look beautiful after you take them out of the hot oven. Repeat with the rest of the filo ribbons. (I use about one sheet per cup but you may use more if needed). 


Bake for 5 minutes. Wait until a little cooler and place somehwere safe as they are very flaky. 


Decorate as you wish before or after you place the ice-cream. Enjoy! 


Sunday, June 21, 2015

Multigrain Slices with Goat Cheese & Figs


     These slices of heaven are not only so easy to make but they are delicious.  I particularly love the texture: crunchy bread with toasted seeds and grains, creamy goat cheese, combined with soft and sweet figs,  topped with walnuts and honey.  Figs are often taken for granted perhaps because they are on the market only from June through September, unless you can find European varieties which can be found through autumn.  Figs are full of nutrients among which are fiber, vitamin B6 and potassium. They are also known to lower blood pressure. But forget about the nutrients, figs are so delicious! Enjoy! 

Makes 5 slices / 10 halved slices  

Ingredients: 

5 - slices of multigrain bread (or any bread you like)

Salted butter 

5 - ripe figs, skinned then sliced in circles 

4oz - whipped goat cheese (regular is ok too)

walnuts for garnishing 

honey for garnishing 

Directions: 

Turn on your oven to broil. Butter the bread on both sides and place on a cookie sheet. Broil on high for 1-2 minutes or until the slices are golden brown(if you have a panini machine, you can also use it to brown the slices). Spread the goat cheese on each slice and add the figs on top (about half of a fig on each slice). Sprinkle with walnuts and then top with tiny bit of honey as you don't want to overpower the flavor of the figs. Enjoy! 


Thursday, June 18, 2015

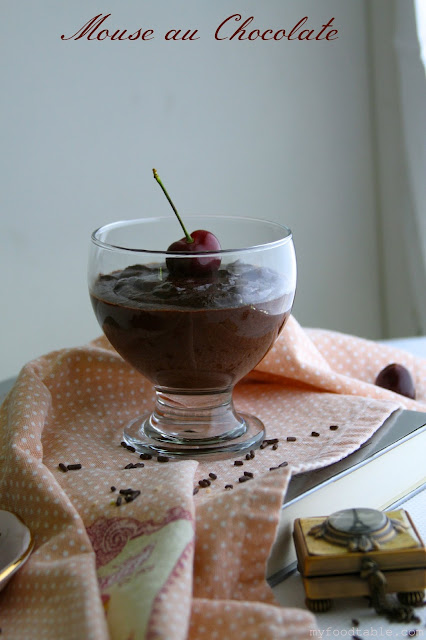
Mouse au Chocolaté


This recipe inspiration came to me when I was in Paris last in 2015. We had our son William (age 2) with us so we were not able to go out to eat much. On the bright side we were able to explore all the local bakeries and try all sorts to pastries.  Mouse au Chocolate was probably one of my favorites.  I got it from supposedly one of the best bakeries in Paris called Pain De Sucre.  It was served chilled in a tiny adorable glass jar. 


 It was thick and not too sweet but yet rich.  It was just the perfect desert to end a meal with.  At that moment I just knew I had to try and make it at home. So I did.  I took a traditional french recipe and made a few major changes to fit my own taste.  It has no added sugar which is so great! You will be shocked how easy it is to make.  I hope you enjoy it as much as I do.  It takes me back to Paris with every chocolaty bite.  Bon Appetit!


Makes 4-6 servings 

Ingredients:

6 - pasteurized egg whites 

6 - pasteurized egg yolks

1 1/3 cups - semi sweet chocolate chips

a pinch of tartar 

a pinch of salt 

Directions:

1. Melt the chocolate in a double boiler or in a metal heat proof bowl placed over a saucepan of boiling water. Stir as chocolate is melting. Remove from heat when melted to cool slightly.

2. Prepare four 3-inch diameter ramekins or ice-cream/pudding glasses.

3. Beat egg whites and cream of tartar on low and then increasing slowly. Beat eggs until stiff but not dry.

4. Stir egg yolks into the chocolate. Gently stir in a third of the egg white mixture into the chocolate.

5. Combine the chocolate mixture into the with the egg white mixture and gently mixture together completely.

6. (Optional) I like to return my mouse back over the boiling water just so I can cook the eggs a little more. Be careful not to over cook the mixture as it will get more like a fudge than mouse like. Also the fluffiness of the eggs will disappear and you don't want that. Take off the heat when mixture starts sticking to the bowl. Make sure you stir consistently. Again this step is optional.

7. Spoon the mouse into the prepared ramekins or glasses. Cover with a surround wrap placing it directly over the mouse. Chill completely and then serve. (Mouse will taste significantly better when it is completely chilled. So make sure you keep it refrigerated).

Notes:

*Pasteurized eggs should remove any risk of Salmonella from eating raw eggs. The statistics on contracting Salmonella are pretty slight but off course follow your own judgment. 


Wednesday, June 17, 2015

Traveling abroad with an infant/toddler


   My husband and I love traveling. We have always loved going to Europe as we prefer a city vacation vs a cruise or a beach vacation. Mainly we like to walk to major attractions even if we have to walk ten miles to get there. In the mean while we discover unpopular attractions, restaurants and hidden places where only the locals enjoy. We walk all day and love to eat local foods and people watch along the way.
     When our son was born, we were still determined to go on a European vacation at least once a year. In the fall of 2012, our son was only 11 months old when we took him to Paris and Bulgaria. He was not mobile at the time and it was super easy to get him places. It was doable even though Paris and Bulgaria are not the most kid friendly countries as far as transportation goes. We still got a great vacation out of it and didn't have any regrets. So yes, if you have a kid that is not walking yet, it is absolutely doable to go on a vacation abroad and actually enjoy it.


      In June, 2015 we decided to do another trip to France and take our now two year old boy with us. We thought it would be just as easy as the first time. I thought the biggest challenge would be the long flight since our son is very active. I was wrong about almost everything. He did really well with the flights but airports and the busy and loud city of Paris seemed overly stimulating for him. We had planned to stay in Paris for two weeks and our wild little guy took probably a whole week to get used to the time difference and this too contributed to his behavior. We even took him to Disney Land-Paris hoping that this would make him happy but he simply could not handle standing in line for all the rides. We went on total of three rides and the rest of the time we spent at the disney land play ground. 


 If you are wondering whether to take your toddler with you or not, as harsh as it might sound, I would recommend looking for another option unless you don't have one. I can honestly say that it was fun but most of the time it was very hard and we didn't get as much out of our EU vacation as we usually do. There are a few things to consider before you make a decision: 

- Does your toddler do well with noise (vacuum, cars, sirens, etc)?
- Does your toddler behave when he/she is around a lot of people? 
- Does your toddler like to go on long walks in the stroller and does your toddler mind being strapped? 
- Does your toddler do well with change of environment? 
- Can they sit still? 
- Does your child follow commands well?

If you answer NO to all of these questions, there is no doubt that you WILL have a hard time. Your stroller will be one of the best things for your trip. If your toddler can't handle the stroller it will be very difficult to do anything. 

We were able to do maybe one or two sight seeing and the rest of the time we spent in the area where we stayed.  If you absolutely have to take your toddler with you here are a few tips to make your vacation abroad much more pleasant:  


 Here are some recommendations if you are traveling with your child/children (3 months and older): 

1. Booking the flight. If you are doing a long international flight I personally would recommend a day trip. I have never done a night flight but I wouldn't take my chances and have a crazy toddler crying and screaming while everyone else is trying to sleep. But again that is my personal preference. Call the airline a few days in advance to assign you a bulk head and request a bassinet. I have used it and it is great. Your child gets too sleep comfortably and you get your hand and lap free. Usually the bassinets are free of charge. The size and weight requirements vary between the different airlines. Usually infants weighing up to 29 lbs but again this depends on the airline. So make sure you qualify. Children under 2 years old fly free unless you decide to book a seat for them. In that case you can have a car seat attached to the airplane seat. If you are traveling with a toddler you may request a kid's meal. 
Call the airline one more time, perhaps the day before and make sure that they have booked your seating and bassinet. Sometimes you have to call a few times to make sure they have it right. If you are flying with a few family members and for some reason you have not booked your seating together you may request that you sit next to each other by calling the airline. Double check on line and make sure they have seated you together. If not call again. Sometimes they can't make those changes for you, but you may request a seating together before you board. Usually they can make those changes there and then. 

2.Booking a hotel/apartment. If you are traveling with a toddler I would invest in the place you are staying at as you might be spending a lot of time there. The more the place offers the better. It is very important that you book a hotel/apartment by a park or a playground. Your child will be much happier and will make your experience abroad much better. Children just want to play. 

3. Going through customs. If you have a baby, you will most likely transport liquids. Formula, breast milk, and juice for infants or toddlers are permitted to be brought on board the aircraft so it's OK to bring with you. All you have to do is tell the TSA officer that you are traveling with a baby and you are caring milk. If you are taking a stroller with you, most airports demand that the stroller is folded in order to go through. If you are planning on walking long distances it is good to have a rain cover for your stroller.

4. The flight. If you have a really active toddler, I would recommend CARES Safety Restraint Belt. We used it for our little guy and it worked like a miracle. It gave him the feeling he is in a car seat so there was no question about being too wild during the flight. Obviously you can definitely unbuckle your child when the safety light is off so he/she can sleep comfortably. During take off is the most common time for kids to fall asleep due to the motion of the airplane. Have them drink something or suck on a pacifier as this will help their ears pop from the elevation pressure. International airlines provide a small pillow and a light blanket but most of the time it gets so cold that I would recommend bringing with you an extra blanket for your child. A small pillow is also nice to have in the stroller where your child may fall asleep sometimes during the trip so I would recommend taking a small pillow with you as well. 

5. Entertainment. If you are traveling with a non mobile child, probably you won't need much entertainment so I would recommend taking only a few things with you. I remember I took maybe 2-3 toys with me when my son was 11 months and he did great. If you are traveling with a toddler I highly recommend an iPad - (if your child is not into cartoons yet, she/he can play toddler games or try baby Einstein), it truly is the best investment I have ever made and it is totally worth it. It saved us big time. Stickers (easy and don't need much space). Play-Doh is messy but is a great way to kill time. Other than that play with whatever you have in hand. A bottle, a cup, a straw, a spoon, ice, a magazine, opening and closing the window shutters, buttons on the seat and screen, opening and closing the seat belt (when you don't have to have your seat belt on), waving HI to the a fellow passenger (hopefully you have plenty of those that like kids), small amounts of water, etc. You may bring a glow in the dark toys as that would be fun when the lights go off. Although I would not recommend glow in the dark sticks. They may brake and make a glow in the dark mess. Bring a few candies or something sweet in case of a melt down but I in no way recommend giving your child too much sugar. Sugar means energy, protein foods means sleepy, as your body takes time to process them. You may request milk during the flight, cold or warm. Lollipops, gummy candy, pretzels are great as they take time to eat, and you want to buy all the time you can. 

At the end something to remember, you will survive, you will get there. Other people have children too and most people will understand. Remember to have a little fun and know you are building memories you will laugh about later. I would love to hear your storries so don't hesitate to share. Have a great trip! :)


Saturday, June 13, 2015

Mediterranean Salad with Greek Yogurt Dressing


Summer is here and I tend to crave more veggies and fruits. Salads are great in the summer but it is always the dressing that gets you when it comes to calories. This easy, mediterranean salad is full of nutrition and I can eat a whole bowl of it without feeling guilty. There are many versions as you can add or take out ingredients but its basics (lettuce and yogurt) are still delicious by themselves.  I grew up eating this salad and was one of my favorites. I hope you like it. 

Makes 1 - 2 servings 

Ingredients: 

12 - leaves romaine lettuce, shredded 

1/2 cup - plain greek yogurt 

2 tablespoons - virgin olive oil 

2-3 teaspoons lemon juice (to taste) 

salt to taste (I put quite a bit as it is more flavorful)

2 green onion, chopped 

sliced cucumbers (optional) 

kalamata or black olives (optional) 

Directions:

Mix the lettuce, oil and salt in a bowl. Use your hands to smash the lettuce. (This releases all the lettuce juice and allows the lettuce to absorb the oil and lemon juice). Add the lemon juice, desired veggies (olives, cucumbers, green onions)and mix together. Salt again if necessary. Serve chilled. That's it! It is that easy.