Thursday, August 27, 2015

Vietnamese Chicken Salad Rolls & Peanut Sauce


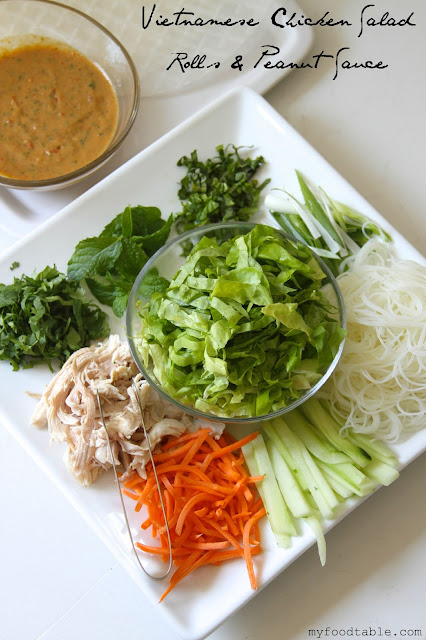
     If you have never had Vietnamese Chicken Salad Rolls you will fall in love with these. SO yummy!! Fresh, light yet rich in flavor and super nutritious, these rolls are super easy and fun to make. I was able to find all the ingredients at my local grocery store which is a huge plus. You have a combination of crunchy and soft, and the peanut sauce is worth making all by itself. It is not too sweet and it has a little kick to it. It is perfect for the rolls. If you are vegetarian all you have to do is remove the chicken. These will taste just as good. I have been having these for the last two days and it seems like I can't get enough. Just look at all the fresh veggies and herbs that goes into the roll. YUM!

Vietnamese Chicken Salad Rolls 

Ingredients: 

rotisserie chicken (pulled)

1/2 english cucumber (cut into little strips) 

carrots, grated 

fresh basil 

butter lettuce 

green onion

fresh mint, chopped 

fresh cilantro, chopped 

rice paper 

rice noodles or rice sticks (you want the rice noodles that look like angel hair) 

Directions:

Prepare all fresh ingredients and reserve. Cook rice noodles according to package instructions (run under cold water if the package doesn't already say so). Prepare a big flat plate or clean surface to lay softened rice paper. Dip one rice sheet paper in warm water until ends start to curl and the paper is softened. (10-12 seconds). Lay the sheet on your work surface. Work quickly while paper is still moist. Layer ingredients close to one end of the paper or you may start in the middle.


 Wrap as a mexican borrito. Take one end and cover over the entire ingredients. Tuck underneath. Pull each side over and cover the ends. Then continue to roll until completely encased. Usually the back of the rice paper package has detailed instructions and pictures if you have a hard time. 

Thai Peanut Sauce 

Ingredients:

1/4 cup coconut milk

1/4 cup creamy peanut butter 

juice of a 1/2 a lime 

2 teaspoons soy sauce 

2 cloves fresh garlic, crushed 

2 teaspoons sugar 

2 teaspoons ground ginger 

3 tablespoons sweet chili sauce 

1/4 cup minced cilantro 

dash of salt 

Directions: 

Combine all ingredients in a blender or food processor (a hand food processor may be used as well). Blend until completely smooth. Serve and enjoy!


Monday, August 24, 2015

Feta Stuffed Peppers


      I have been dying to try to stuff mini peppers with feta for a while now.  I miss Bulgarian food so much and especially stuffed peppers with feta and eggs. Here in the United States the peppers are thick skinned and it is almost impossible to duplicate the pepper recipes from back home. The mini mexican sweet peppers they sell here are probably the closest peppers to texture that you could get. This recipe was an attempt to get at least a little bit of the Bulgarian taste I used to remember and I think I succeeded. I love, love, love this appetizer/side dish. This is an easy 1, 2, 3 recipe and it tastes wonderful. Good quality feta makes a difference so make sure you buy a good one. I personally like cow's feta cheese but it is hard to find. My second choice would be sheep's milk feta. Bore's Head is a good brand. These peppers will make your kitchen smell SO good too. Enjoy!

Ingredients: 

10 mini sweet peppers 

8oz good quality feta cheese 

1 large egg 

dash of salt 

dash of ground pepper 

olive oil 

parsley, chopped for garnishing (optional) 

Directions: 

Preheat oven to 400 degrees F. Half the peppers and clean from seeds. Place in a baking pan.  In a small bowl mix together the feta and the egg. The consistency doesn't have to be perfectly smooth. Lumps of feta cheese are ok. With a small spoon stuff the peppers as much as you can, covering the little crevasses. Drizzle bountifully with olive oil (the olive oil will help your peppers cook faster make them more tender). Sprinkle with a little bit of salt and pepper. Bake in the oven about 30 minutes. Serve immediately.    

Sunday, August 23, 2015

Avocado Salsa


I recently went to a party where they served this avocado salsa with chips and it was so good I kept going back for more. It was delicious,  yet light, nutritious and the crunchy and salty chips were just the perfect addition to it. Not to mention it was perfect for the month of August when tomatoes are ripe and corn is fresh. I just knew I had to put it on the blog. I do have a few suggestions: use good quality tomatoes and feel free to play with the salt and lemon. We all have different tastes so just make it perfect for you. I hope you like it as much as I do. 


Ingredients: 

1 (16 oz) package frozen corn kernels, thawed (canned corn is ok)

2 (2.25 oz) cans ripe black olives, drained and sliced 

1 small onion, thinly chopped

1/4 cup lemon juice

3 ripe tomatoes, chopped 

1/3 cup olive oil

1/2 teaspoon salt or to taste 

1/2 teaspoon ground black pepper or to taste 

4 avocados, peeled, pitted and diced 

1 teaspoon dried oregano (optional) 

2 cloves garlic, minced (optional) 

3 tablespoons cider vinegar (optional) 

Directions: 

Toss all the ingredients except the avocado in a big bowl. For best flavor refrigerate overnight. If you don't have that option salad is still good. Mix in the avocado right before serving. Serve with chips or add to your favorite wrap. Enjoy!

Monday, August 17, 2015

Tea Party


This is in not your Downton Abbey tea party but still a fun and elegant way to gather together with your girlfriends. Tea parties are a great way to celebarte bridal showers, baby showers or just a fun way to gather with the girls. And we women sure know how to keep up the conversation especially around a table full of yummy stuff. This post offers menu ideas and table decor from fancy to inexpensive ways to make your tea party a success. Enjoy and don't forget to share pictures with me if you use this post to organize your tea party. 


 The Menu: 


SAVORY: (OPTIONAL - you may choose to do only deserts as long as you pick a time that is in-between breakfast, lunch and dinner.)

Tea Sandwiches (cucumber, prosciutto with goat cheese and honey, pesto caprese, ricotta with orange jam and mint).  


Salad of your choice - optional (pasta salad is a great option and filling since the tea sandwiches are quite small) 


Directions: To cut the sandwiches in these fun shapes, use cookie cutters. Lay bread flat on a cutting board then press the bread with a book or another cutting board to smash the bread slightly. It is much easier to cut. You can use different kinds of bread to get layers of different colors. 

   Cucumber sandwich : layer a piece of round bread. Top with hummus and then a cucumber. Add salt and pepper. (You may substitute the hummus with tzatziki sauce, olive tapenade or simply butter according to yours or your guests taste).
  
  Pesto Caprese: layer a piece of bread. Top with pesto sauce, add a slice of tomato and fresh mozzarella cheese. Drizzle with olive oil. Garnish with salt, pepper and fresh basil. 

Prosciutto & Goat Cheese: you may use 2 or 3 pieces of bread for this sandwich. Whipped goat cheese is easier to spread but regular one is ok too. Top with a few slices of pear and drizzle with just a little bit of honey. (Prosciutto can be expensive. If you are organizing a party for a large group, you may substitute with bacon or turkey). 

Ricotta and Jam: the jam can be orange or apricot. Wonderful combination with peaches on top and the mint it is garnished with adds so much to the flavor! Don't skip it. 


SWEETS: (You may choose all or just a few of these wonderful additions to your tea party) 

French Macarons - Vanilla: for the best recipe click here.  If you must know I am a complete french macaron junkie. I think every tea party should have french macarons. It is something your guests will love and this french vanilla flavor will go so perfectly with you tea. The other great thing about these is you can prepared them in advance and just refrigerate for a whole week before your event. You can buy some but I can guarantee you that this recipe is better than a store bought macarons unless off course you buy them from a professional bakery such as Laduree. 


Creme Brûlée: for the perfect recipe click here. This desert can also be prepared in advance. It can sit in the fridge for up to a week. It is also a great addition to your tea party that everyone will love. 

Madeleines: are known to be served with tea, hot cocoa or coffee. This recipe is SO easy and delicious that you might end up making these on a regular basis. It takes only 30 minutes to prep and make these. For Orange Madeleines click here. For Lime Madeleines click here.


Fruit Bars: this recipe was inspired by the cherry almond bars I did for 4th of July with just a few changes. Follow this recipe but use the following filling instead of the canned cherries: 
    Mix softened cream cheese with any jam of your choice. You don't have to decorate the bars just cut with the same cookie cutters you used for the tea sandwiches and dust with powedered sugar. 


Fruit: Any fruit is great to serve at a tea party. In my case I did raspberries and strawberries as it also served as beautifying the table and it gave my table a little pop. 
Fresh Lemon is a must as people will use it for their tea.

Drinks: 

     Tea: what would a tea party be without the tea??? You may have two or more kinds of teas. If you want to get a little fancy you may go to the local tea shop and get a fine tea that will actually require a tea sifter. If not I am sure people would still like tea bags as it is much easier. For my party I decided to stick with Herbal Teas (Mint and Lavender/Camomile). If you are doing tea party in the hot summer you might consider iced tea instead or in addition to your variety to teas. 

Cream or Vanilla Soy Milk: most people that like tea love to use cream or vanilla soy milk in their teas. You don't have to have much just about a cup to cup and a half.

Hot Chocolate (optional): if you are doing a tea party in the winter hot chocolate is a great addition to your tea party. 


Tea Party Table Setting 


You will need china, napkins, flatware, center piece and anything else you would like to use that is tea party appropriate. You can make your tea party as fancy or as simple and inexpensive, yet still fun as you wish. If you have a china set that has been sitting in your cupboard without use this is the time to use it. The china doesn't have to match. Mixing it a bit is actually quite fun. If you don't have a china but you would like to use one, ask any relatives that might have some. Usually a grandmother or a mother in law might one. Same with the flatware and napkins. Also consider renting it. 
      If you want to make it simple yes you may use simple mugs. You may even use fun paper plates and cups. Click here for this fun paper set you can find on amazon. You can find so many fun disposable items on Amazon, from table cloths to floral straws, to tea party decorating flags. So you can go as cheap or as expensive as you wish. 
     I have said this many times but I will say it again, the food plays a huge role in your table's decor. All you really need is a center piece. I picked pink roses as I though it would best match my china. Off course if you are organizing a tea party for a bridal shower I would have in mind the bride's color theme and stick with it. Stacking tea cups is also a fun and creative idea to decorate your table with. Add deserts or flowers to the stacked cups and you have a fun decor. Pearl necklaces and more flowers would make your party a little more fancy as well. I added a floral pillow to one of the chairs as a nice addition to the table decor as well. And at the end, remember to use your imagination and have fun with it. 


Monday, July 13, 2015

German Pancakes With Butter Syrup

Truth is there is nothing healthy about these German Pancakes.  Yet these are SO ridiculously delicious that frankly the calories won't matter. Every bite is a piece of rich buttery delight that you won't regret. And the butter syrup is to die for! Serve with fruit and/or powdered sugar and you have yourself the best breakfast ever!!!


Makes 4 Servings 

Ingredients: 

5 tablespoons butter

2/3 cups milk 

1/4 teaspoon salt 

4 eggs

2/3 cup flour 

Directions: 

Heat oven to 450 degrees F. Put butter in 9/13 pan. Mix eggs, flour, and salt in a bowl. Put baking dish with butter in oven until melted. Take dish out of oven and pour flour mixture into the hot baking dish. (Be careful as it will splash). Turn oven down to 425 degrees F. Return baking dish to oven. Bake 12-20 minutes or until golden brown. Cut into peaces, drizzle with butter syrup (recipe below)and serve immediately. 


Ingredients:

1 1/2 sugar 

1 stick of butter

2 tablespoons Karo syrup 

1/2 baking soda 

1/2 teaspoon vanilla 

3/4 cup butter milk 

Directions: 

Place in pan butter, sugar, butter milk and syrup until melted and boiling. Take off stove and add vanilla and soda. Stir and serve. It is good stored in the fridge for four days. 

Tuesday, July 7, 2015

West African Chicken


This is our family's new favorite recipe, ready in 30 minutes. My husband who is perhaps the pickiest man alive, (the only fruit he will eat is citrus. Crazy! I know!) LOVES this meal. So did my picky two year old. It is absolutely healthy, easy and 100% delicious. No baking. Just cook in a frying pan. I am so excited to share this recipe with you because you will love it. Serve over rice or cus - cus and enjoy! 

Serves: 3 

Ingredients:

1 tablespoon olive oil

5 - boneless chicken thighs,cubed 

1 yellow onion, diced

2 teaspoons curry powder 

1/2 can diced tomatoes, drained  

1/2 green bell pepper, diced 

2 tablespoons peanut butter 

2 teaspoons chicken stock powder

salt and pepper to taste 

Directions: 

Heat oil in a heavy pan and fry the chicken and onion on medium high heat until chicken is no more pink. Add curry powder and cook for 1 minute, stirring continuously. Add remeining ingredients, decrease heat to medium and cook and stir until well blended and peppers are tender (about 10minutes). You may mash the tomatoes while you stir if you don't like big chunks of tomatoes. Also you may add hot sauce if you like spicy food. Have a taste and if chicken is too bland add salt and pepper. Serve over rice, cus - cus or by itself. Enjoy!


Friday, July 3, 2015

Easy Orange Madeleines


This is the easiest Madeleine cookie recipe you will ever make. Not only easy but also delicious and uses basic ingredients you already have in your kitchen. This is a good basic recipe where you may also use to try other flavors such as lime and lemon. All ready in a little over 30 minutes. You will love these! 

Ingredients: 


2 - eggs 

1/2 cup - sugar 

2 tablespoons orange zest

3 dashes - salt 

1 teaspoon - vanilla extract 

1 1/2 teaspoons orange extract

1 cup - flour 

11 tablespoons - unsalted butter, melted and cooled slightly 

powdered sugar to garnish (optional) 

Directions:

Preheat oven to 400 degrees F. Grease the madeleine pan with butter. In a standing mixer (you may use a hand mixer too), beat eggs and sugar until just blended. Add zest, orange extract, vanilla and salt. Mix until just blended. Add the flower and beat until blended. Gradually add cooled melted butter in steady stream, beating just until blended. 

Spoon 1 tablespoon batter into each indentation in pan. Bake until puffed and brown on the edges (9 minutes). Gently remove from pan. Repeat process. If you'd like dust cookies with powdered sugar and serve. 

Notes: Do not store the cookies in a closed container. If you wish to keep them crunchy leave them out overnight.  


Thursday, July 2, 2015

Easy Lime Madeleines


French Madeleine cookies are generally served with tea, hot cocoa, coffee and milk in France and the UK. To me Madeleines are not too sweet but complementary to whatever you are drinking. You will be surprised how easy this recipe is.  The ingredients are so simple that you most likely already have them in your kitchen. All you need is a madeleine pan. I developed this recipe so that the outcome would be absolutely perfect! Crunchy and buttery on the outside and soft and spongy on the inside. I love the lime flavor because it is fresh and it leaves a really nice flavour on your pallet. Madeleines are best served right out of the oven or on the same day of baking. You will love these! Bon Appetit!

Makes: 20 - 24 cookies 
Prep Time: 15 min 
Bake Time: 18 min 

Ingredients: 

2 - eggs 

1/2 cup - sugar 

2 fresh limes - zest from both limes. One of the limes juiced. 

3 dashes - salt 

1 teaspoon - vanilla extract 

1 cup - flour 

11 tablespoons - unsalted butter, melted and cooled slightly 

powdered sugar to garnish (optional) 

Directions:

Preheat oven to 400 degrees F. Grease the madeleine pan with butter. In a standing mixer (you may use a hand mixer too), beat eggs and sugar until just blended. Add zest, lime juice, vanilla and salt. Mix until just blended. Add the flower and beat until blended. Gradually add cooled melted butter in steady stream, beating just until blended. 

Spoon 1 tablespoon batter into each indentation in pan. Bake until puffed and brown on the edges (9 minutes). Gently remove from pan. Repeat process. If you'd like dust cookies with powdered sugar and serve. 


Tuesday, June 30, 2015

Eggs with Peppers & Goat Cheese


Breakfast is the most important meal of the day yet we often take it for granted. These eggs with peppers and goat cheese are incredibly delicious and at the same time super nutritious and easy to make. The peppers provide Vitamin C, the eggs provide protein and the goat cheese provides calcium. Serve with toast and a serving of fruit and you are ready to start your day just right. My friend and I have this sometimes even for lunch because it is that good. If you don't like goat cheese, try this recipe with good qality feta. Enjoy! 

Makes 2 servings 

Ingredients: 

5 - eggs (you may do just 5 egg whites as well)

5 - mini sweet peppers,chopped or sliced  

3oz - goat cheese, crumbled 

1 teaspoon + 1 tablespoon - olive oil 

salt and pepper to taste 

Directions: 

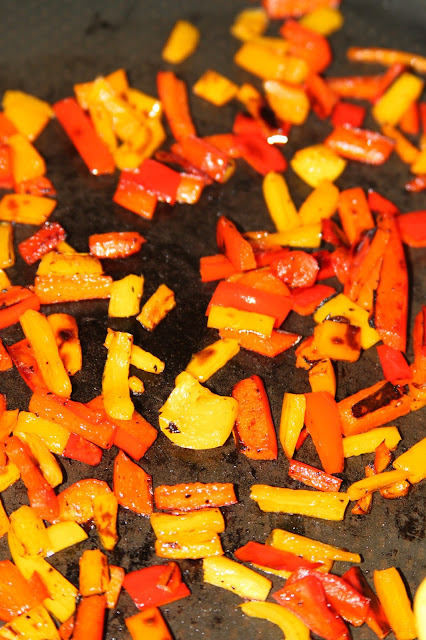
Fry the peppers on medium heat with 1 teaspoon olive oil, cover for best results. Peppers are done when they are tender and you notice the skin of the pepper is starting to brown. 


Take pan off heat and turn heat to low. Allow a minute or two to cool off. Scramble the eggs in a bowl. Do not over scramble.

 Add 1 tablespoon of olive oil, salt and pepper to the peppers and mix. Return to heat and add the eggs. Fry eggs and peppers until eggs are almost done. Add the goat cheese and mix while scraping the bottom of the pan. Eggs are ready when cheese is mixed well. You may add more salt or pepper if needed. Garnish with a little more goat cheese if desired. Enjoy this healthy breakfast! 


Sunday, June 28, 2015

Cherry Almond Bars


I LOVE the combination of cherries and almonds. These contemporary bars can not taste any more perfect. They state summer, they state American and you will not be able to be satisfied with only one piece. This desert is perfect for 4th of July celebrations or in my case any day of the year. It is made with canned cherries vs cherry pie filling and that makes all the difference in the world. But I should stop bragging about it. This desert will speak for itself. Enjoy! 

Ingredients:

2 blocks - unsalted butter

2 cups - vanilla milk (or white) chocolate chips

4 eggs

1 cup - sugar

2 cups - flour

1/2 teaspoon - salt

2 teaspoons -  amaretto or almond extract

2 cans - canned cherries (Oregon brand preferably), well drained

1/4 of a cup - sliced almonds + more for garnish

sweet raw cherries for garnish

blueberries for garnish (optional if you desire to decorate the bars as the American flag)

Directions:

Heat oven to 325 degrees F. Grease 9" by 13" baking dish. Melt butter in a small sauce pan over low heat. Remove from heat. Add ONLY 1 cup of the vanilla chips. LET STAND; DO NOT STIR.

In a large bowl, beat eggs until foamy. Gradually add sugar, beating at high speed until lemon-colored. Stir in vanilla milk chip mixture. Add flour, salt and amaretto; mix at low speed until just combined.

Spread half of batter (about 2 cups) in greased and floured pan. Bake at 325 F for 15 - 20 min or until light golden brown.

Stir remaining 1 cup vanilla milk chips into remaining half of batter; set aside.

Warm up the canned cherries in a small sauce pan over medium heat. Stir and mash the cherries until they look like they are easily spreadable. If too much juice, drain. Spread evenly over warm, partially baked crust. Sprinkle with 1/4 cup of almonds.

Gently spoon teaspoonfuls of remaining batter over fruit and almond spread hiding the fruit. If fruit still shows sprinkle more almonds.

Return to oven; bake an additional 25 to 35 minutes or until toothpick inserted in the center comes out clean. Cool completely. Decorate with fresh cherry halves and almonds. Blueberries as well if desired to decorate bars as the American flag. Cut into bars and enjoy!


Saturday, June 27, 2015

4th of July Table Setting


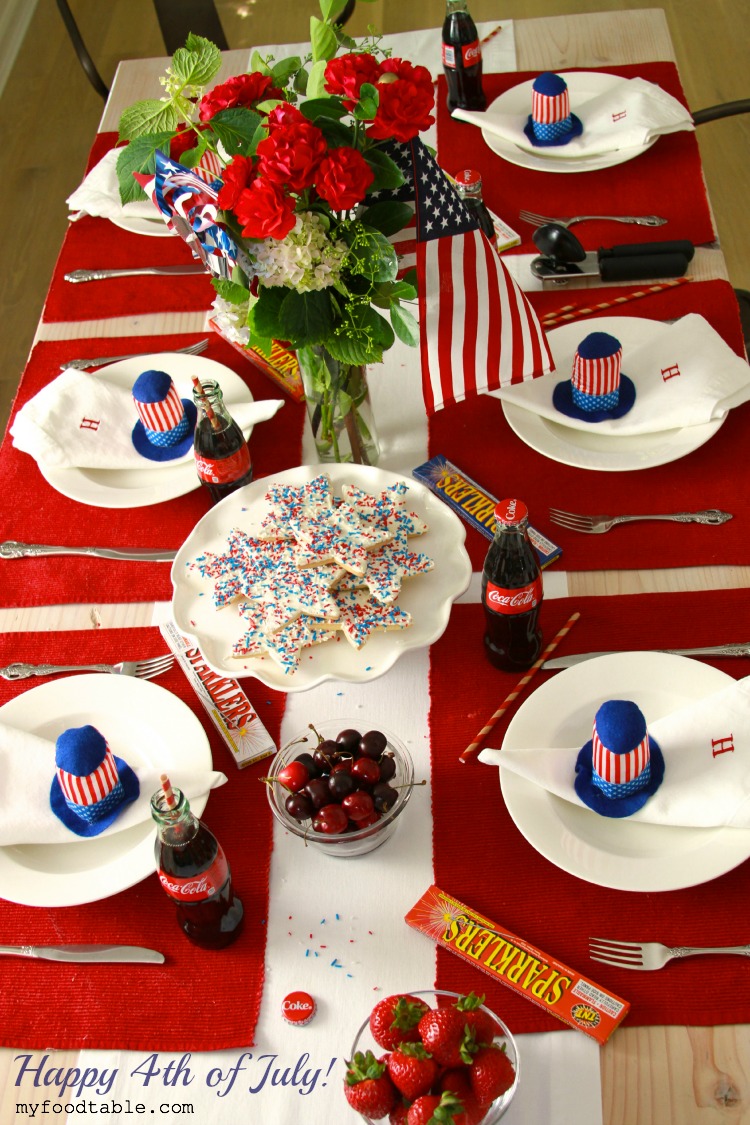
If you are hosting a 4th of July lunch or dinner, this table setting is very easy and inexpensive to do. Here is how: 

1. My guess is you already have a plain white table cloth or a table runner. It is a standard for every home. You also probably have plain white napkins. That's great because you will need them too. Red or blue ones would work too.

2. Red or blue placemats. I used the ones I had from Christmas. If you don't have any they can be found at Walmart for very cheap.

3. Plain white plates. They are standard so you should have some at your home. If you don't have any they are super easy to find. Even at the dollar store.

4. Sparklers are very inexpensive and a great addition to your 4th of July table and you get to use them after dark. You can even tie a ribbon around them if you would like.

5. USA little hats for decoration over the plates. I found those at Walmart. You can really use anything as long as it is red, or blue. White might work too.

6. Centerpiece. In my case I used red and white flowers. You can use one or the other. I would try to stick with the same colors that are on your table. Any other colors may deviate from the theme.

7. Flag and Toy Windmill.  I put a flag and a toy windmill in the vase with the flowers to make it a little more patriotic and to connect the centerpiece with the rest of the items on the table.

8. Decorate with food. Food is so great to decorate with since you will end up eating it anyway. I love the COKE idea since Coke is a great symbol of America. Also any food that is July appropriate or American especially if it is of the same color theme such as Cherries, Cookies, Berries, Pies, etc.


Easy Spring Table Setting

 I love springtime! The beautiful blossoms on the trees, the flowers adding color to the scenery, the flower fragrance I can smell in the air, and watching people walking all around enjoying sun's warm rays. I particularly love purple flowers, and so I thought it would be appropriate to incorporate purple for my spring table setting. This table setting is very inexpensive, and so easy. 

           
     Start with picking three colors that you like. Perhaps use colors that you already have in your kitchen, table napkins that you already own that are spring colors or perhaps flowers that are already growing in your backyard or your favorite flowers that you are planning on using as a center piece. In my case I went with purple, yellow and green. As you can see on the picture below I also have light and dark purples, dark and lime greens and the yellow is definitely the accent. 


For the center pieces you will need short vases or anything that is short with clear glass. They don't have to match as long as they are clear and about the same hight. I used a clear vase, a clear bottle, two wine glasses and a glass jar from a candle. I used six of them but you may use as many as you wish. Cut the flowers to fit the vases and arrange. There you go, you have simple center pieces. I had these vases for a week after the dinner and they made my kitchen smell divine. If you have a round or square table I would suggest that you use one center piece that is fuller with flowers.

You will need basic white plates and color napkins that match the centerpieces or color plates that match the centerpieces and basic white napkins. I used a plain white table runner as it made the colors of the flowers pop but you may use a different color. For example this setting I could have used a yellow or lavendar color table cloth. I picked white because you can never go wrong with white. White also gives this setting ellegance and simplicity. 


If you know me you will find that I have an eye for detail. I like cemetric things. Try to aline the plates the same distance from the edge of the table. Match the same position of the plates across the other side of the table. Repeat with the glasses, silverware and napkins. 


If you want to make it a little fancy and more personal, add name tags. These are the easiest name tags I have ever made. I used an ink stamp and then manually wrote the name of the person on the name card. You may also write something like "Happy Spring", or whatever the ocassion is. Just remember use your creativity and have fun!  

Thursday, June 25, 2015

Filo Dough Pastry Cups


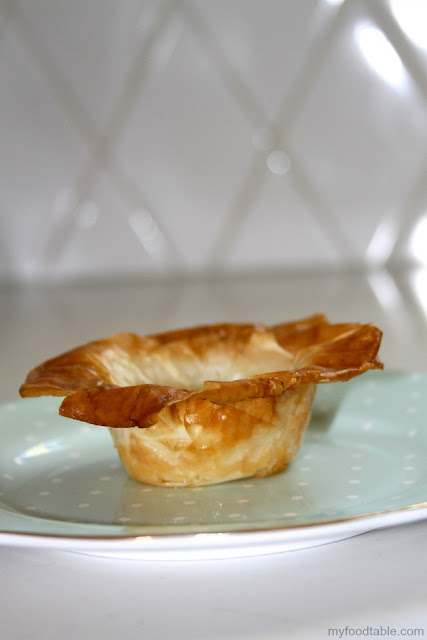
Summer can be overwhelming with all the planned activities. If you are planning a summer party of any kind, do yourself a favor and don't make your life more complicated than it already is. Simply invite people over to have some ice-cream. Some might think this would be boring, but look at these filo dough pastry cups you can make, with which you can do so much. They are buttery and crunchy and delicious.  Add ice-cream,  frozen yogurt or gelato, and decorate the pastry cup with chocolate, nuts, honey, mint, peanut butter,  jam, wafer sticks,  fruit, sprinkle with coco powder or anything you can think of. There are so many options! All of a sudden your ice-cream party will be the hit of the day! 

Ingredients: 

8 oz - fillo dough (9"by 14"sheets) - thawed 

1 stick - butter, melted 

granulated sugar 

oil spray 

Directions:

Preheat oven to 400 F. On a clean surface place a sheet of filo dough (make sure you keep the rest of the sheets wrapped in the plastic while you work with one sheet. They will dry fast otherwise.)With a rubber brush, butter slightly the filo sheet. With a spoon drizzle lightly the sheet. Cut the sheet in ribbon like sheets and fold into a muffin pan to form the muffin cup, pressing the sides and the bottom. Trust me this would not look pretty but they will look beautiful after you take them out of the hot oven. Repeat with the rest of the filo ribbons. (I use about one sheet per cup but you may use more if needed). 


Bake for 5 minutes. Wait until a little cooler and place somehwere safe as they are very flaky. 


Decorate as you wish before or after you place the ice-cream. Enjoy! 


Sunday, June 21, 2015

Multigrain Slices with Goat Cheese & Figs


     These slices of heaven are not only so easy to make but they are delicious.  I particularly love the texture: crunchy bread with toasted seeds and grains, creamy goat cheese, combined with soft and sweet figs,  topped with walnuts and honey.  Figs are often taken for granted perhaps because they are on the market only from June through September, unless you can find European varieties which can be found through autumn.  Figs are full of nutrients among which are fiber, vitamin B6 and potassium. They are also known to lower blood pressure. But forget about the nutrients, figs are so delicious! Enjoy! 

Makes 5 slices / 10 halved slices  

Ingredients: 

5 - slices of multigrain bread (or any bread you like)

Salted butter 

5 - ripe figs, skinned then sliced in circles 

4oz - whipped goat cheese (regular is ok too)

walnuts for garnishing 

honey for garnishing 

Directions: 

Turn on your oven to broil. Butter the bread on both sides and place on a cookie sheet. Broil on high for 1-2 minutes or until the slices are golden brown(if you have a panini machine, you can also use it to brown the slices). Spread the goat cheese on each slice and add the figs on top (about half of a fig on each slice). Sprinkle with walnuts and then top with tiny bit of honey as you don't want to overpower the flavor of the figs. Enjoy! 


Thursday, June 18, 2015

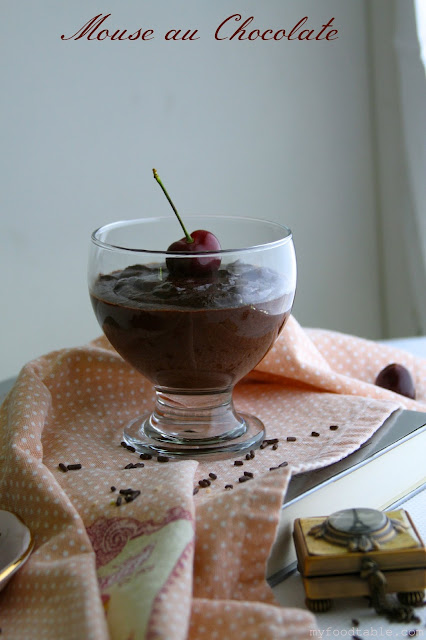
Mouse au Chocolaté


This recipe inspiration came to me when I was in Paris last in 2015. We had our son William (age 2) with us so we were not able to go out to eat much. On the bright side we were able to explore all the local bakeries and try all sorts to pastries.  Mouse au Chocolate was probably one of my favorites.  I got it from supposedly one of the best bakeries in Paris called Pain De Sucre.  It was served chilled in a tiny adorable glass jar. 


 It was thick and not too sweet but yet rich.  It was just the perfect desert to end a meal with.  At that moment I just knew I had to try and make it at home. So I did.  I took a traditional french recipe and made a few major changes to fit my own taste.  It has no added sugar which is so great! You will be shocked how easy it is to make.  I hope you enjoy it as much as I do.  It takes me back to Paris with every chocolaty bite.  Bon Appetit!


Makes 4-6 servings 

Ingredients:

6 - pasteurized egg whites 

6 - pasteurized egg yolks

1 1/3 cups - semi sweet chocolate chips

a pinch of tartar 

a pinch of salt 

Directions:

1. Melt the chocolate in a double boiler or in a metal heat proof bowl placed over a saucepan of boiling water. Stir as chocolate is melting. Remove from heat when melted to cool slightly.

2. Prepare four 3-inch diameter ramekins or ice-cream/pudding glasses.

3. Beat egg whites and cream of tartar on low and then increasing slowly. Beat eggs until stiff but not dry.

4. Stir egg yolks into the chocolate. Gently stir in a third of the egg white mixture into the chocolate.

5. Combine the chocolate mixture into the with the egg white mixture and gently mixture together completely.

6. (Optional) I like to return my mouse back over the boiling water just so I can cook the eggs a little more. Be careful not to over cook the mixture as it will get more like a fudge than mouse like. Also the fluffiness of the eggs will disappear and you don't want that. Take off the heat when mixture starts sticking to the bowl. Make sure you stir consistently. Again this step is optional.

7. Spoon the mouse into the prepared ramekins or glasses. Cover with a surround wrap placing it directly over the mouse. Chill completely and then serve. (Mouse will taste significantly better when it is completely chilled. So make sure you keep it refrigerated).

Notes:

*Pasteurized eggs should remove any risk of Salmonella from eating raw eggs. The statistics on contracting Salmonella are pretty slight but off course follow your own judgment.